Squiggles research computer server: Difference between revisions
| (47 intermediate revisions by the same user not shown) | |||
| Line 1: | Line 1: | ||
=== Introduction === | === Introduction === | ||
"Squiggles" is a dedicated research computer server | "Squiggles" is a dedicated research computer server tailored for the analysis and storage of MEG, Neurophysiology, and Epilepsy data. This guide outlines how to connect using either the recommended FastX connection or the traditional VNC method. | ||
=== Access Requirements === | === Access Requirements === | ||
==== RCC Account ==== | ==== RCC Account ==== | ||
* | |||
* Register for an account | * An RCC (Research Computer Server) account is necessary to access "Squiggles". | ||
* If prompted, | * Register for an account at [https://docs.rcc.mcw.edu/user-guide/accounts/ MCW-Infoscope's Research Computing Center]. | ||
* | * If prompted, select "others" and then "squiggles" to specify the server you wish to access. | ||
* Account approval generally takes 1-3 days. For any issues, contact Help-RCC at <help-rcc@mcw.edu>. | |||
=== Login to Squiggles === | === Login to Squiggles === | ||
''' | '''Choosing a User Port:''' Each user is allocated a specific port number. New users should pick a port number (##) not already in use: | ||
{| class="wikitable" | {| class="wikitable" | ||
| Line 18: | Line 19: | ||
|- | |- | ||
|Jeff Stout | |Jeff Stout | ||
|5910,5911 | |5910, 5911 | ||
|- | |- | ||
|Joe Heffernan | |Joe Heffernan | ||
|5912 | |5912 | ||
|- | |||
|Manoj Raghavan | |||
|5913, 5998, 5999 | |||
|- | |- | ||
|Candida Ustine | |Candida Ustine | ||
|5914 | |5914 | ||
|- | |- | ||
|Chad Carlson | |Chad Carlson | ||
| Line 74: | Line 75: | ||
|5929 | |5929 | ||
|- | |- | ||
|Vahab | |Setayesh Abiazi Shalmani | ||
|5930 | |||
|- | |||
|Vahab Youssof Zadeh | |||
|5931 | |5931 | ||
|- | |- | ||
| Line 80: | Line 84: | ||
|5935 | |5935 | ||
|- | |- | ||
|Cameron J Stewart | |Rupesh Chikara | ||
|5944 | |||
|- | |||
|Cameron J Stewart | |||
|5992 | |5992 | ||
|} | |} | ||
===== SSH Tunneling ===== | ===== SSH Tunneling ===== | ||
* ''' | * '''PowerShell Method (Mac/Linux/Windows):''' In a bash shell, terminal, or Windows PowerShell, execute the following to set up an SSH tunnel for the VNC Viewer: | ||
<code>ssh | <code>ssh -L 59##:localhost:59## USER@squiggles.rcc.mcw.edu</code> | ||
where USER is your rcc user account and ## is the selected port number | |||
* ''' | * '''PuTTY (Windows):''' | ||
[https://www.chiark.greenend.org.uk/~sgtatham/putty/ Download | [https://www.chiark.greenend.org.uk/~sgtatham/putty/ Download PuTTY] for SSH tunneling and refer to the images below for configuration: | ||
PuTTY is an open-source software for SSH Tunneling (or SSH Port Forwarding). | PuTTY is an open-source software used for SSH Tunneling (or SSH Port Forwarding). | ||
[[File:Putty config1.PNG]] | [[File:Putty config1.PNG]] | ||
[[File:Putty config2 tunnel.PNG]] | [[File:Putty config2 tunnel.PNG]] | ||
=== | === Starting a Session and Connecting to Squiggles === | ||
Ensure you've established an SSH tunnel before proceeding with either the VNC or FastX methods. | |||
==== VNC Method ==== | ==== VNC Method (preferred) ==== | ||
* '''Creating & Accessing a VNC Session''': | * '''Creating & Accessing a VNC Session''': | ||
** VNC sessions | ** VNC sessions initialize automatically upon boot-up. | ||
** If issues | ** If issues occur, manually initiate a session using: <code>vncserver :## -geometry 1900x1200</code>, where <code>##</code> is your specific port number. | ||
** | ** Access the session using the [[https://www.realvnc.com/en/connect/download/viewer/ RealVNC viewer]]. | ||
** | ** Input <code>localhost:##</code> in the server address bar, where <code>##</code> corresponds to the last two digits of your port. | ||
[[image:vncviewer.png]] | [[image:vncviewer.png]] | ||
==== FastX Method ==== | <!-- ==== FastX Method (alternative) ==== | ||
FastX | FastX offers a potentially smoother experience compared to VNC, especially with multiple concurrent users. | ||
* | * Download the [https://www.starnet.com/fastx/current-client FastX client] and: | ||
** | ** Start FastX. | ||
** | ** Click '+' to establish a new connection. | ||
** | ** Provide the Connection Name, host (squiggles.rcc.mcw.edu), and your RCC username. | ||
** | ** Start a session by clicking '+' and using the command <code>/etc/X11/xinit/xinitrc</code>. | ||
[[File: FastX_config.png]] --> | |||
=== Troubleshooting === | === Troubleshooting === | ||
;'''Identifying Active Users''' | |||
:To compile a list of users with active VNC sessions, which aids in monitoring current access to the VNC service, execute: | |||
:<code>ls -l /tmp/.X11-unix</code> | |||
< | :This information can be used to oversee session activity and ensure that resources are allocated efficiently. | ||
rm -f /tmp/. | |||
rm -f /tmp/.X11-unix/ | ;'''Terminating a VNC Session''' | ||
:For situations where session termination is necessary, you can directly close a VNC session through the terminal or opt for manual termination if the direct method is insufficient. To directly terminate a session, use: | |||
:<code>vncserver -kill :##</code> | |||
:Replace <code>:##</code> with your session number. | |||
;'''Manual Termination of the VNC''' | |||
:For manual termination, proceed to remove the session files with: | |||
:<code>rm -f /tmp/.X##-lock</code> | |||
:<code>rm -f /tmp/.X11-unix/X##</code> | |||
:Ensure to replace <code>X##</code> with the correct session identifier. This allows for removing stuck or unresponsive sessions that cannot be closed normally. | |||
;'''Alternative Solution: when Manual Termination of the VNC does not work''' | |||
:Use the following command, replacing <code><username></code> with the actual username: | |||
:<code>ps -ef | grep <username></code> | |||
:This will list all processes related to the specified user. You can then terminate unwanted sessions by killing the process IDs: | |||
:<code>kill -9 <PID></code> | |||
:Where <code><PID></code> is the process ID obtained from the previous command's output. | |||
:Optional: To check the environment variables active during a VNC session, which can help in troubleshooting further issues, view the VNC environment log: | |||
:<code>cat ~/vnc.log</code> | |||
;'''VNC connection‑closed / black‑screen issue''' | |||
:Anaconda’s base environment can interfere with VNC and close the session. | |||
:Deactivate it after login: | |||
:<code>conda deactivate</code> | |||
;'''Disable Conda auto‑activation (so you don’t have to run <code>conda deactivate</code> each time)''' | |||
:If you seldom need Conda inside VNC, turn off automatic activation: | |||
:* Run <code>conda config --set auto_activate_base false</code> (this updates <code>~/.condarc</code>), **or** | |||
:* Edit <code>~/.bashrc</code> and comment out / delete the line that calls <code>conda activate base</code>. | |||
:After logging out and back in, Conda will stay inactive by default; activate it later with <code>conda activate <env></code> only when needed. | |||
</pre> | </pre> | ||
Latest revision as of 15:23, 21 April 2025
Introduction
"Squiggles" is a dedicated research computer server tailored for the analysis and storage of MEG, Neurophysiology, and Epilepsy data. This guide outlines how to connect using either the recommended FastX connection or the traditional VNC method.
Access Requirements
RCC Account
- An RCC (Research Computer Server) account is necessary to access "Squiggles".
- Register for an account at MCW-Infoscope's Research Computing Center.
- If prompted, select "others" and then "squiggles" to specify the server you wish to access.
- Account approval generally takes 1-3 days. For any issues, contact Help-RCC at <help-rcc@mcw.edu>.
Login to Squiggles
Choosing a User Port: Each user is allocated a specific port number. New users should pick a port number (##) not already in use:
| User | Port |
|---|---|
| Jeff Stout | 5910, 5911 |
| Joe Heffernan | 5912 |
| Manoj Raghavan | 5913, 5998, 5999 |
| Candida Ustine | 5914 |
| Chad Carlson | 5915 |
| Chris Anderson | 5916 |
| Serena Thompson | 5917 |
| Patrick Bauer | 5918 |
| Jeff Binder | 5919 |
| Leo Fernandino | 5920 |
| Lisa Conant | 5921 |
| Aqil Izadysadr | 5922 |
| Nick Guzowski | 5923 |
| Zack Harper | 5924 |
| Bill Gross | 5925 |
| Michelle Kassel | 5926 |
| Greg McQuestion | 5927 |
| Monica Keith | 5928 |
| Priyanka Shah | 5929 |
| Setayesh Abiazi Shalmani | 5930 |
| Vahab Youssof Zadeh | 5931 |
| Songhee Kim | 5935 |
| Rupesh Chikara | 5944 |
| Cameron J Stewart | 5992 |
SSH Tunneling
- PowerShell Method (Mac/Linux/Windows): In a bash shell, terminal, or Windows PowerShell, execute the following to set up an SSH tunnel for the VNC Viewer:
ssh -L 59##:localhost:59## USER@squiggles.rcc.mcw.edu
where USER is your rcc user account and ## is the selected port number
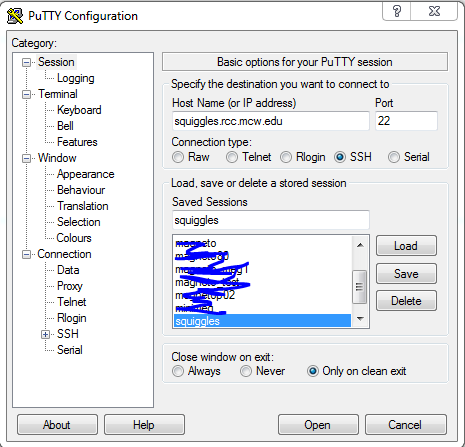
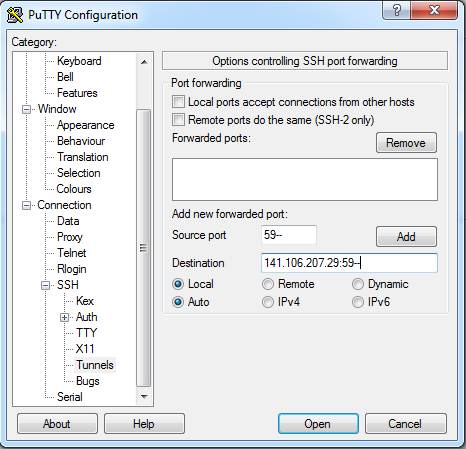
- PuTTY (Windows):
Download PuTTY for SSH tunneling and refer to the images below for configuration:
PuTTY is an open-source software used for SSH Tunneling (or SSH Port Forwarding).
Starting a Session and Connecting to Squiggles
Ensure you've established an SSH tunnel before proceeding with either the VNC or FastX methods.
VNC Method (preferred)
- Creating & Accessing a VNC Session:
- VNC sessions initialize automatically upon boot-up.
- If issues occur, manually initiate a session using:
vncserver :## -geometry 1900x1200, where##is your specific port number. - Access the session using the [RealVNC viewer].
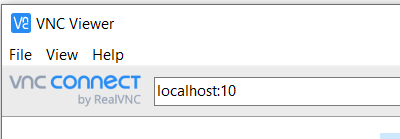
- Input
localhost:##in the server address bar, where##corresponds to the last two digits of your port.
Troubleshooting
- Identifying Active Users
- To compile a list of users with active VNC sessions, which aids in monitoring current access to the VNC service, execute:
ls -l /tmp/.X11-unix- This information can be used to oversee session activity and ensure that resources are allocated efficiently.
- Terminating a VNC Session
- For situations where session termination is necessary, you can directly close a VNC session through the terminal or opt for manual termination if the direct method is insufficient. To directly terminate a session, use:
vncserver -kill :##- Replace
:##with your session number.
- Manual Termination of the VNC
- For manual termination, proceed to remove the session files with:
rm -f /tmp/.X##-lockrm -f /tmp/.X11-unix/X##- Ensure to replace
X##with the correct session identifier. This allows for removing stuck or unresponsive sessions that cannot be closed normally.
- Alternative Solution: when Manual Termination of the VNC does not work
- Use the following command, replacing
<username>with the actual username: ps -ef | grep <username>- This will list all processes related to the specified user. You can then terminate unwanted sessions by killing the process IDs:
kill -9 <PID>- Where
<PID>is the process ID obtained from the previous command's output.
- Optional: To check the environment variables active during a VNC session, which can help in troubleshooting further issues, view the VNC environment log:
cat ~/vnc.log
- VNC connection‑closed / black‑screen issue
- Anaconda’s base environment can interfere with VNC and close the session.
- Deactivate it after login:
conda deactivate
- Disable Conda auto‑activation (so you don’t have to run
conda deactivateeach time) - If you seldom need Conda inside VNC, turn off automatic activation:
- Run
conda config --set auto_activate_base false(this updates~/.condarc), **or** - Edit
~/.bashrcand comment out / delete the line that callsconda activate base.
- Run
- After logging out and back in, Conda will stay inactive by default; activate it later with
conda activate <env>only when needed.


