Squiggles research computer server: Difference between revisions
No edit summary |
|||
| Line 1: | Line 1: | ||
=== Introduction === | === Introduction === | ||
"Squiggles" is a dedicated research computer server for the analysis and storage of MEG, Neurophysiology, and Epilepsy data. | "Squiggles" is a dedicated research computer server designed for the analysis and storage of MEG, Neurophysiology, and Epilepsy data. This guide elucidates the steps to connect using either the recommended FastX connection or the traditional VNC method. | ||
=== Access Requirements === | === Access Requirements === | ||
==== RCC | ==== RCC Account ==== | ||
To | * To utilize "Squiggles", an RCC (Research Computer Server) account is mandatory. | ||
* | * Register for an account on [[https://infoscope.mcw.edu/RCC/Research-Computing-Center.html|MCW-Infoscope's Research Computing Center]]. | ||
* If | * If prompted, choose "others" followed by "squiggles" to indicate the server of interest. | ||
* | * Adhere to the ensuing steps to kickstart a new session and gain remote access to Squiggles. | ||
=== | === Connecting to Squiggles === | ||
Before proceeding with either the VNC or FastX methods, ensure you've established an SSH tunnel: | |||
==== SSH Tunneling Method (for Mac/Linux/Windows) ==== | ==== SSH Tunneling Method (for Mac/Linux/Windows) ==== | ||
In a bash shell, terminal, or Windows PowerShell, execute the following to set up an SSH tunnel for the VNC Viewer: | |||
<code> ssh -N -L 59**:localhost:59** squiggles.rcc.mcw.edu</code> | <code>ssh -N -L 59**:localhost:59** squiggles.rcc.mcw.edu</code> | ||
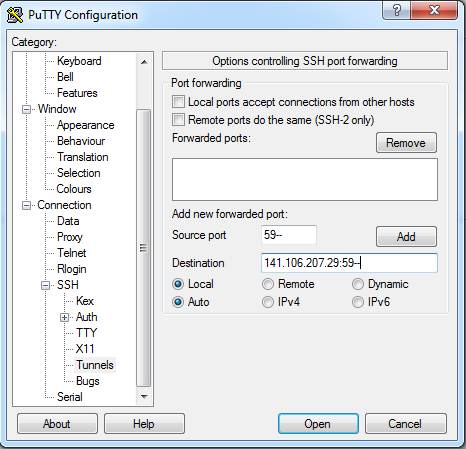
==== VNC Method | ==== VNC Method ==== | ||
'''Configuration''': | '''For Windows Users:''' | ||
* | * '''Configuration''': | ||
* [[https://www.chiark.greenend.org.uk/~sgtatham/putty/|Download Putty]] for SSH tunneling. | |||
[[File:Putty config1.PNG]] | |||
[[File:Putty config2 tunnel.PNG]] | |||
'''VNC User Ports:''' | |||
Each user has a dedicated port number for login: | |||
... (include the table here) ... | |||
'''Creating & Accessing a VNC Session''': | |||
* VNC sessions are initialized automatically during boot-up. | |||
* If issues arise, manually start a session with: <code>vncserver :## -geometry 1900x1200</code>, replacing <code>##</code> with your specific port number. | |||
* For access, employ the [[https://www.realvnc.com/en/connect/download/viewer/|RealVNC viewer]]. | |||
* In the server address bar, input <code>localhost:##</code>, where <code>##</code> matches the last two digits of your port. | |||
| | |||
[[image:vncviewer.png]] | |||
==== | ==== FastX Method ==== | ||
FastX is potentially a more seamless alternative to VNC, especially when handling many simultaneous users. | |||
* Fetch the [https://www.starnet.com/fastx/current-client|FastX client] and then: | |||
** Launch FastX. | |||
** Press '+' to set up a new connection. | |||
** Enter Connection Name, host (squiggles.rcc.mcw.edu), and your RCC username. | |||
** To begin a session, tap '+' and use the command <code>/etc/X11/xinit/xinitrc</code>. | |||
* | |||
** | |||
** | |||
** | |||
** To | |||
[[File: FastX_config.png]] | [[File: FastX_config.png]] | ||
=== Troubleshooting === | === Troubleshooting === | ||
* '''VNC Black Screen''': Experiencing a black screen after VNC login? Ensure you've deactivated Anaconda Python prior. Command: <code>conda deactivate</code>. | |||
* '''VNC Black Screen | * '''Persistent VNC Issues''': Switch to the FastX method. | ||
* ''' | * '''Killing a VNC session''': In terminal, <code>vncserver -kill :xx/</code>. For manual termination: | ||
* '''Killing a VNC session''': In | |||
<pre> | <pre> | ||
rm -f /tmp/.Xxx-lock | rm -f /tmp/.Xxx-lock | ||
rm -f /tmp/.X11-unix/Xxx | rm -f /tmp/.X11-unix/Xxx | ||
</pre> | </pre> | ||
* ''' | * '''Identifying Active Users''': Command <code>ls -l /tmp/.X11-unix</code>. | ||
Revision as of 17:13, 30 August 2023
Introduction
"Squiggles" is a dedicated research computer server designed for the analysis and storage of MEG, Neurophysiology, and Epilepsy data. This guide elucidates the steps to connect using either the recommended FastX connection or the traditional VNC method.
Access Requirements
RCC Account
- To utilize "Squiggles", an RCC (Research Computer Server) account is mandatory.
- Register for an account on [Research Computing Center].
- If prompted, choose "others" followed by "squiggles" to indicate the server of interest.
- Adhere to the ensuing steps to kickstart a new session and gain remote access to Squiggles.
Connecting to Squiggles
Before proceeding with either the VNC or FastX methods, ensure you've established an SSH tunnel:
SSH Tunneling Method (for Mac/Linux/Windows)
In a bash shell, terminal, or Windows PowerShell, execute the following to set up an SSH tunnel for the VNC Viewer:
ssh -N -L 59**:localhost:59** squiggles.rcc.mcw.edu
VNC Method
For Windows Users:
- Configuration:
* [Putty] for SSH tunneling.


VNC User Ports: Each user has a dedicated port number for login:
... (include the table here) ...
Creating & Accessing a VNC Session:
- VNC sessions are initialized automatically during boot-up.
- If issues arise, manually start a session with:
vncserver :## -geometry 1900x1200, replacing##with your specific port number. - For access, employ the [viewer].
- In the server address bar, input
localhost:##, where##matches the last two digits of your port.

FastX Method
FastX is potentially a more seamless alternative to VNC, especially when handling many simultaneous users.
- Fetch the client and then:
 ** Launch FastX.
 ** Press '+' to set up a new connection.
 ** Enter Connection Name, host (squiggles.rcc.mcw.edu), and your RCC username.
 ** To begin a session, tap '+' and use the command /etc/X11/xinit/xinitrc.

Troubleshooting
- VNC Black Screen: Experiencing a black screen after VNC login? Ensure you've deactivated Anaconda Python prior. Command:
conda deactivate. - Persistent VNC Issues: Switch to the FastX method.
- Killing a VNC session: In terminal,
vncserver -kill :xx/. For manual termination:
rm -f /tmp/.Xxx-lock
rm -f /tmp/.X11-unix/Xxx
- Identifying Active Users: Command
ls -l /tmp/.X11-unix.